Work Ticket Records - Adding a New Work Item
Work items should be created for each work ticket if it is confirmed that specific works will be carried out on the selected asset.
Either single or multiple work items can be assigned to each work ticket.
To add a new work item, you must begin by entering the initial details you are prompted for in the Work Ticket form.
The following information should be added to the Add New Work Items area:
Checklist - You must select the appropriate defect checklist from the drop-down box.
- Once selected, click the Set button to activate the ability to add new work items.
- Click Reset to select an alternative checklist.
Defect Group - Select the appropriate defect group from the drop-down list. The entries in this list are controlled by the checklist that was selected for the work ticket.
Defect Type - Use the drop-down menu to select the required Defect Type. This entry in this list are controlled by the defect group that was selected in the previous step.
Local Priority Factor - If your organization uses Local Priority Factors, the values can be set up and added here.
Response Time - If Service Level Response times have been set up, the appropriate response time for the selected asset/defect will be automatically populated here.
Cause - Set up and add values to track the cause of defects in this field.
Location - A textual description of the location of the defect.
Start Ch./End Ch. - Enter start and end chainage values to aid in locating the defect in the field (for road, footpath and kerb assets only).
Add - Click the Add button to proceed to the Work Item Detail form to be prompted for more information.
Reset - Click the Reset button to discard these changes and start over.
Once you hit the Add button in the Add New Work Items section of the Work Ticket form, you will be presented with the Work Item Detail form:
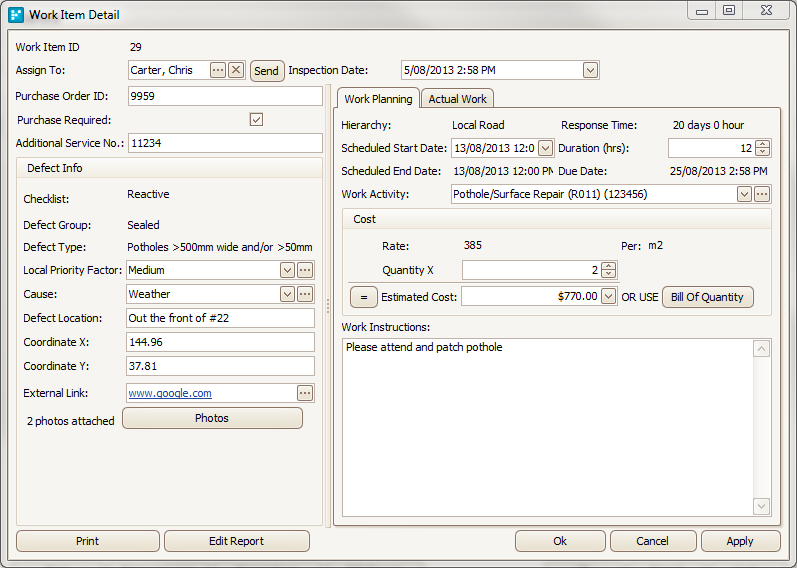
The Work Item Detail Form & the Work Planning tab
The following information is stored in the Work Item Detail form:
Work Item ID - A unique, database ID number will be automatically generated once the Work Item Detail form is saved.
Linked Inspection/Customer Request - If the Work Items corresponding Work Ticket was created from an Inspection or Customer Request, a link to the record will be provided at the top of the form.
Assign To - Click the ellipsis button to activate the Address Book, select the contact you want to assign the job to and click Assign.
Inspection Date/Time - If the defect was inspected, the date and time of the inspection may be entered here. The due date will be calculated from this inspection date for assets/defects with configured response times.
Purchase Order ID/Additional Service No - If the organization utilizes purchase order IDs and/or additional service numbers, these may be entered here.
Checklist/Defect Group/Defect Type - These entries are duplicated from the information supplied in the work ticket and cannot be altered through this form.
Local Priority Factor/Cause/Defect Location/Chainages/Photos - This information is lifted from information entered into the work ticket. If required, changes can be made to these entries via this form.
Coordinate X/Coordinate Y - These fields may be used to store the GPS coordinates to assist with locating the defect when the work is carried out.
External Link - If there are photos hosted on the Internet, or a Web address contains information related to the work item, or the work ticket corresponds to a record in a third-party application, insert the URL here.
Print - Click Print to print the details of the work item in report form.
OK/Cancel/Apply - OK saves and closes the Work Item window, Cancel closes the Work Item window and discards any changes, Apply saves the Work Item and keeps it open.
Work Planning tab
This is where the information and estimates are entered prior to work being carried out.
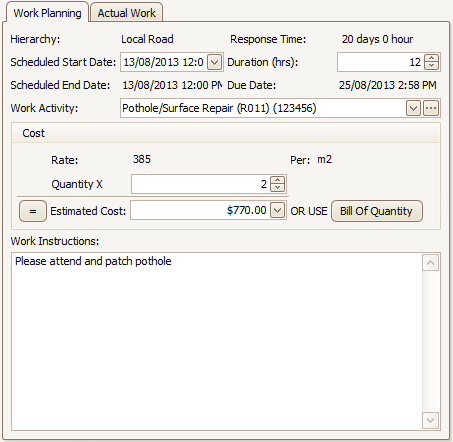
Work Item Detail form - Work Planning tab
The following information can be added to the Work Planning tab:
Hierarchy - This value is generated automatically and reflects the hierarchy of the selected asset.
Response Time - If Service Level Response times have been configured,
- This value is generated automatically and reflects the amount of time there is to repair the defect based on the date of inspection and service level requirements.
Scheduled Start Date - Using the drop-down arrow, select the date that you want the work to be scheduled to take place on.
Duration - You may enter the estimated duration of the job (in hours) in this field.
Scheduled End Date - This will display a date that is calculated from the start date if the duration is entered.
Due Date - If Service Level Response times have been set up, the due date will be automatically populated based on the response time listed for the type of defect and the date it was inspected.
Work Activity - Select the prescribed work activity from the drop-down list.
- The values in this list can be controlled by the defect type selected.
- If the work activity you require is not included and you have the appropriate system privileges, you may add it via the Activity Based Costing window by clicking the ellipsis button. Refer to section 1.8.2 Activity Based Costing for more information.
Rate/Per - These values refer to costings and are generated automatically via the information entered into the Activity Based Costing section.
- This is the cost per unit of measurement set for the selected work activity.
Quantity X - Using either the up and down buttons in the form by typing a number on the keyboard, enter an estimate of the quantity required to fulfill the work activity based on the fixed unit type.
Estimated Cost - Click the = (equals) button to automatically populate the estimated cost based on the information saved within the Activity Based Costing section.
- You may also use the drop-down menu to access a calculator or manually type in the costing estimation.
Bill of Quantity - For difficult or non-standard jobs, use the Bill of Quantities tool to generate a more accurate cost estimate.
- If required, click the Bill of Quantity button to activate the window (see below).
- Then add specific items and their costings to the job based on the information that was set up in the Bill of Quantity Configurations.
- Click OK when done to add these values to the work item.
Work Instructions - Any specific instructions that may assist in carrying out the specified work may be added in this section.
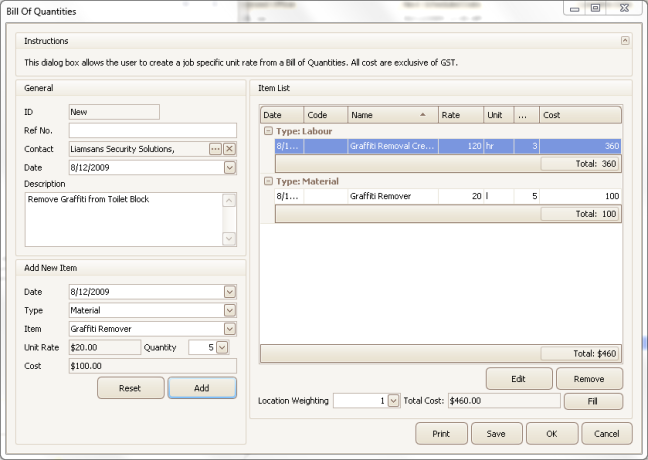
Using Bill of Quantities for Cost Estimation
Actual Work tab
This is where the actual figures are entered for completed work and associated costs once the work has been carried out.

Work Item Detail form - Actual Work tab
The following information can be added to the Actual Work tab:
Auto Fill - Clicking this button will automatically fill in the Actual Work values with those that have been currently stored under Work Planning.
- This is good to use when the works have been completed according to the original plan and budget.
Actual Location - The location where the works took place (this may differ from the planned location).
Actual Start Ch. - (for roads, footpaths and kerbs) The start chainage value from where the works took place.
Actual End Ch. - (for roads, footpaths and kerbs) The end chainage value from where the works took place.
Work Activity - The work activity that was carried out in the field (select the appropriate value using the drop down box).
Rate/Per - These values relate to the costings and are generated automatically based on the information entered within the Activity Based Costing section.
- This is the cost per unit of measurement set for the selected work activity.
Quantity X - Using either the up and down buttons provided or your keyboard, enter the actual quantity that was required to fulfill the work activity based on the fixed unit type.
Person Hour - Enter the number of person-hours that were required to complete the work activity.
Bill of Quantity - For difficult or non-standard jobs, you may wish to use the Bill of Quantities tool to help generate the actual cost.
- If required, click the Bill of Quantity button to activate the window.
- Then add specific items and their costings to the job based on the information that was set up under the Bill of Quantity Configuration.
- Click OK when done to add these values to the work item.
Actual Cost - The actual total cost for the completed work activity.
- This can be generated by either using the Bill of Quantity tool,
- clicking on the = button to populate the actual cost as Actual Rate X Actual Quantity or typing the cost in manually using your keyboard.
Complete Date - The date the work activity was completed.
- Please note that this will close the Work Item. If this is the only Work Item on the Work Ticket, the Work Ticket will also be closed.
- If the Work Ticket contains additional Work Items, it won't be closed until complete dates have been entered for all associated Work Items.
Field Comments - Any comments from the field crew or additional information that needs to be stated upon completion of the work activity may be entered here.
